Guitar Recording Through Amplifiers: A Complete Guide to Mastery.
The art and science of recording a guitar extend far beyond pressing the 'record' button. The guitar, in its various forms, possesses an intricate sonic palette, and each tonal nuance represents the essence and soul of the instrument. This guide comprehensively examines the methodologies and considerations essential for capturing acoustic, electric, or classical guitars with studio-grade fidelity. We aim to equip you with the knowledge to produce recordings that genuinely embody the inherent character of the guitar, even within the confines of a home studio setting.
Selecting the Appropriate Guitar for Recording
The initial and perhaps most crucial step in the recording process is the selection of the guitar itself. It's imperative to recognize that the instrument's intrinsic properties profoundly influence the resulting recorded sound. To elucidate, let us delve into a categorical examination of common guitar types:

Acoustic Guitars: Distinctly recognized by their resonant hollow bodies, they possess a rich and diverse tonal range. The challenge and objective when recording these instruments are to accurately capture the harmonious interplay between the body's resonance and the clear articulation of the strings. Different miking techniques, discussed later, offer ways to emphasize or balance these elements.

Electric Guitars: Electric guitars, in contrast to their acoustic counterparts, are primarily designed to interact with external electronic equipment, such as amplifiers. When it comes to recording, they provide an expansive array of tonal possibilities, further broadened by the inclusion of effect pedals and amplification simulations. The recording approach can vary between capturing the direct raw signal or the sound produced through an amplifier.
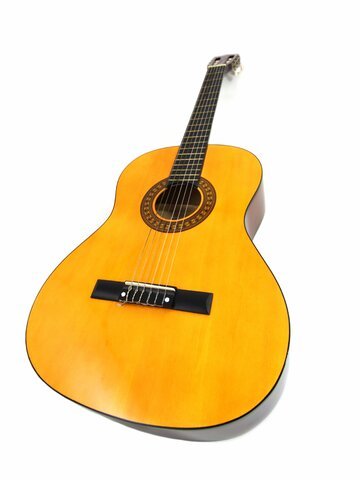
Classical Guitars: Crafted with nylon strings, classical guitars exude a distinctive warmth and tonal smoothness. When recording these instruments, the primary emphasis is on maintaining the inherent warmth while ensuring that each note's natural timbre and sustain are faithfully captured.
In any recording scenario, it's paramount that the chosen guitar is in optimal condition, ensuring it is regularly maintained, equipped with fresh strings, and properly intonated. The instrument's physical state can impact the recording's clarity, richness, and quality.
Fundamentals of the Recording Environment and Techniques
Acoustical Considerations in the Recording Environment
The space one chooses to record undeniably has a marked impact on the resultant sound, given that sound waves interact extensively with their surroundings. Thus, understanding and controlling the elements of your environment is paramount to achieving the desired acoustic quality.
Dimensional Characteristics: A room's size and geometric configuration are pivotal in dictating its acoustic signature. Expansive spaces naturally introduce reverberation, lending a sense of 'airiness' to recordings. Conversely, rooms that approach a perfect square may be plagued by standing waves, which can accentuate specific frequencies and result in an unbalanced sound profile.
Reflection Control: Sound waves rebound off surfaces, and in spaces with abundant hard, flat areas, these reflections can lead to destructive interference or phasing. Such interactions color the sound and may introduce unwanted tonalities. Implementing diffusers or lining walls with absorptive materials like foam or fabric can drastically mitigate these reflections, paving the way for a clearer recording.
Ambient Interferences: The omnipresent ambient noises, often overlooked in casual settings, become glaringly prominent in recordings. These may emanate from outside sources like traffic or internal ones like humming electronics. It's imperative to isolate the recording space from such interference by sealing windows or powering down non-essential devices.
Microphone Principles and Practices
As the recording chain's primary transducer, the microphone warrants meticulous selection and placement. It faithfully translates the guitar's acoustic energy into an electrical signal.
Microphone Types - Dynamic and Condenser
Dynamic microphones, exemplified by models like the Shure SM57, are robust and can endure high sound pressure levels, making them well-suited for close-miking loud sources like guitar amplifiers. On the other hand, engineers categorize condenser microphones by their sensitivity and broad frequency response, which make them ideal for capturing the intricate nuances of acoustic guitars.
Strategic Placement: The position and orientation of the microphone in relation to the guitar dictate the tonal balance captured. For instance, positioning a microphone near the 12th fret of an acoustic guitar, approximately 8-12 inches away, yields a harmonious blend of string clarity and body resonance. However, subtle shifts can emphasize different tonal aspects: moving closer to the soundhole accentuates lows while gravitating towards the neck highlights highs.
Direct Input (DI) Recording and Its Implications: Direct Input (DI) recording offers a direct channel of the guitar's electronic signal for electric guitars, bypassing the complexities of miking.
Signal Purity: DI boxes offer a pure, uncolored representation of the guitar's output, laying a pristine foundation upon which post-processing, like amp simulation, can be applied.
A World of Tonality: Modern amp simulators, such as those developed by Line 6 or IK Multimedia, grant musicians access to many amplifier and cabinet emulations. This flexibility allows for limitless tonal shaping in the post-recording phase.
A Note of Caution: While DI recording provides unparalleled flexibility, it's essential to recognize its potential pitfalls. Though clean, The direct electronic signal can sometimes lack the organic warmth and depth that naturally emanates from an amplifier and room interplay. It's a trade-off to consider based on the musical context and desired outcome.
With these foundational principles, one can embark on the guitar recording journey with confidence and a well-informed perspective.
Recording with Amplifiers: A Comprehensive Overview
The act of recording a guitar amplifier transcends mere technical proficiency, encapsulating both art and science. Understanding how amplifiers function in tandem with guitars and the principles of microphone placement in relation to the amplifier's output can dramatically enhance the quality of recordings. Let's embark on a detailed exploration.
Understanding the Guitar Amplifier
A guitar amplifier essentially amplifies the weak electrical signal generated by a guitar's pickups, turning it into a powerful signal that drives the speakers, thus producing sound. The amplifier is composed of two main sections:

A Bugera guitar amplifier.
The Preamp: This is the initial stage where the raw signal from the guitar is first processed. The signal is boosted, toned, or shaped using EQ controls. Some amplifiers also introduce "gain" or distortion at this stage.
The Power Amp: This takes the conditioned signal from the preamp and amplifies it further, readying it to drive the speaker. It delivers the bulk of the volume and has a significant say in the amplifier's tonal character.
In addition to these core sections, many amplifiers, especially tube amplifiers, have a unique sonic signature due to the types and configurations of tubes they employ.
Diverse Types of Guitar Amplifiers

A Marshall guitar amplifier.
Tube Amplifiers: These use vacuum tubes to amplify the signal. Revered for their warm, organic, and dynamic tone, musicians use tube amplifiers for their harmonically rich distortion.
Solid-State Amplifiers: These utilize transistor circuits to produce amplification. Generally more reliable and lighter than tube amps, solid-state amps deliver a cleaner, more consistent tone.
Hybrid Amplifiers: A combination of tube and solid-state technology, hybrid amps might use tubes in the preamp for their characteristic warmth and solid-state circuitry in the power amp for reliability.
Modeling Amplifiers: Digital amps that use DSP (Digital Signal Processing) to emulate the sound of various amplifiers. They provide versatility but can sometimes lack the natural feel of analog amplifiers.
Contrasting Room Miking vs. Close Miking Techniques:
Room Miking: This method emphasizes the positioning of the microphone at an extended distance from the amplifier, often multiple feet apart. The intent is twofold: to harness the direct sound projected from the amplifier and to register the intricate sound wave interactions as they meld with the room's unique acoustics. Recordings derived from this approach exude a broad, ambient texture enriched by inherent room reverb and a distinct acoustic signature that can augment the depth and spaciousness of a mix.
Close Miking: Close miking involves stationing the microphone inches from the amplifier's speaker. We use this technique to capture a direct, unadulterated sound that radiates a visceral, commanding presence. Such recordings portray the amplifier's intrinsic tonal attributes, largely uninfluenced by external environmental interferences.
The Nuances of Microphone Placement in Guitar Amplification
Capturing the true essence of a guitar's sound as it resonates through an amplifier is both an art and a science. The placement of the microphone, its angle of inclination, and proximity to the amplifier play pivotal roles in shaping the tonal output. To master this craft, let's delve into the finer details of these parameters and understand the significance of specific microphone models and their conventional placements.
Influences of Distance and Angle
The distance between the microphone and the amplifier plays an instrumental role in defining the sonic texture of the recording. This distance alters the frequency and the sense of space, dynamics, and detail in the captured audio. Let's journey through the spectrum of distances and their respective auditory imprints:
Flush Against the Grille (0 inches): When the microphone touches the amplifier's grille, aligned with the speaker's dust cap, the microphone mostly captures high frequencies. This positioning delivers a sound that is sharp and has an immediate, forward presence. Such proximity is excellent for capturing the intricate details and transients, making the guitar sound very much 'in your face.'
Short distance (1-4 inches): Moving the microphone just a few inches away introduces more room and a natural roll-off of the extreme highs. While the sound remains relatively direct and bright, there's a hint of spatial depth and a slightly rounded high-end compared to the grill-flush positioning.
Intermediate Distance (4-12 inches): Venturing further out, the microphone starts to capture a blend of the amplifier's direct sound and the early reflections from the surrounding environment. The tonal balance shifts noticeably: the high frequencies are less aggressive, and there's a more pronounced emphasis on the mid-range and a fuller representation of the bass frequencies. Adding distance between the mic and the amplifier is often preferred for a balanced, natural tone that carries detail and warmth.
Extended distance (1-3 feet): At this range, the microphone begins to record a more pronounced room sound, along with the direct sound of the amplifier. This results in a sound with a pronounced sense of space, often with a natural reverb. The high frequencies further mellow down, and there's a richer sense of the low mids and bass. It's an ideal distance for capturing a more ambient, organic tonality.
Distant Miking (3 feet and beyond): Increasing the distance from the amplifier brings out more room characteristics. The direct sound of the amp becomes one component of a more complex sonic tapestry, interwoven with reflections, reverberations, and ambient nuances of the recording space. The resulting sound is spacious, with a softer high-end and a more diffused tonal profile. Such positioning produces an ambient, 'live room' feel to recordings.


The microphone's proximity to the amplifier is a pivotal parameter in the recording equation. It alters the frequency and the sound's perceived space, depth, and ambiance. As with many aspects of recording, a blend of empirical understanding and creative exploration can guide one toward the desired sonic outcome.
The Intricacies of Microphone Angling in Amplifier Recording
Mic angle is one of the most subtle yet influential factors in shaping the tonal output when recording a guitar amplifier. Angling a microphone towards the speaker can dramatically impact the recorded sound's frequency response, phase relationships, and overall character. To truly understand this dynamic, let's dissect the influence of various angles.

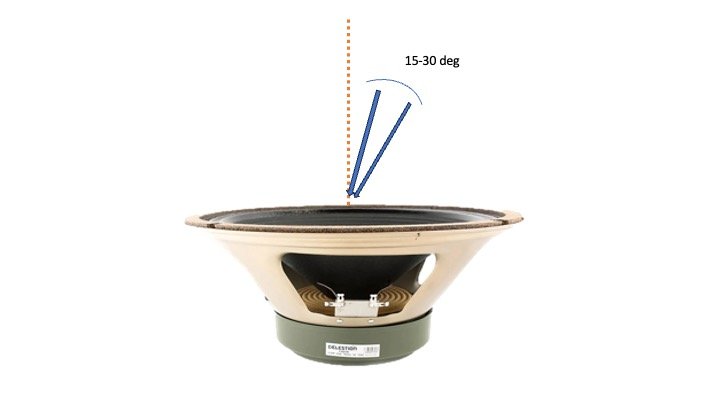

Direct, Head-on Approach (0° angle): When the microphone is positioned perpendicularly to the speaker, facing it directly, the resulting capture offers a balanced frequency spectrum. This positioning is ideal for obtaining a sound accurately representing the amplifier's native tone. There is minimal phase coloration, resulting in a clear, focused sound.
Slight angle (15°-30°): Introducing a modest tilt to the microphone can mellow down the sharpness or brittleness of high frequencies, offering a smoother sonic representation. This angle can also help avoid direct blasts of air from the speaker, which might affect certain sensitive microphones.
Moderate angle (30°-60°): As the angle becomes more pronounced, there's a noticeable attenuation in the higher frequency range, making the sound increasingly warmer. This positioning might also introduce interesting phase variations, adding depth and character to the tonal quality.
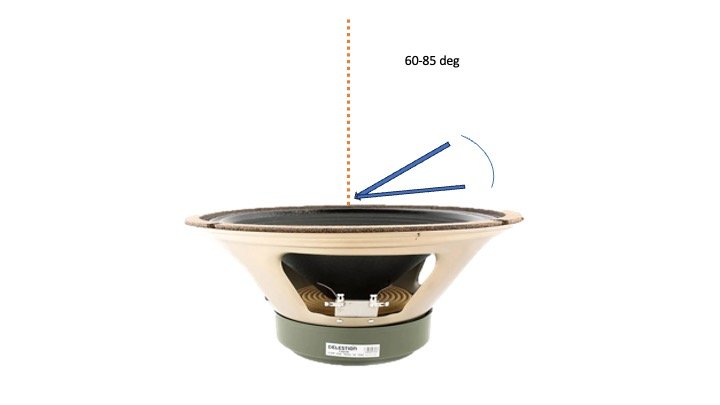
Sharp angle (60°-85°): A steeply angled microphone can often emphasize the lower mids and bass frequencies while significantly dampening the highs. This positioning can be employed when aiming for a richer, more resonant tone. However, it's essential to note that excessive angling might cause certain frequency bands to phase out, potentially leading to a thinner sound.
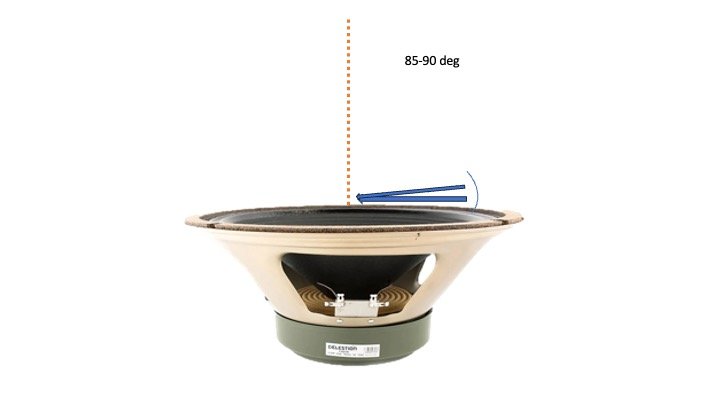
Near Parallel Approach (85°-90°): This extreme angle is rarely used but can offer a unique tonal palette, emphasizing specific frequency pockets while significantly attenuating others. It's an experimental stance and might be used to achieve unconventional sound textures.
Distinguished Microphones and Established Placements for Amplifier Recording
Recording a guitar amplifier is as much about the microphone you use as it is about the guitar or amplifier itself. The right microphone, paired with judicious placement, can accentuate desired frequencies, capture the amplifier's character, and bring out the essence of the guitar's tone. Below are some of the industry's acclaimed microphones and their typical placements:
Shure SM57:
Type: Dynamic
Characteristic Sound: Known for its clear mids and contoured frequency response, the SM57 has a pronounced presence in the mix, with a tight bottom end.
Typical Placement: Regularly stationed perpendicular to the speaker, slightly off-center. This placement captures a balanced tonal profile, ensuring both brightness and warmth come through. For a thicker tone, some engineers might position it closer to the edge of the speaker.
Royer R-121:
Type: Ribbon
Characteristic Sound: The R-121 is celebrated for its smooth highs, robust midrange, and natural and flat frequency response.
Typical Placement: The Royer R-121 is often angled slightly to prevent high-frequency harshness and placed a bit further from the speaker than a dynamic mic. This approach emphasizes the warmth and detail of ribbon microphones, capturing a rounded, vintage-like tonality.
Sennheiser MD 421:
Type: Dynamic
Characteristic Sound: The MD 421 is recognized for its punchy mids, clarity, and wide frequency response, making it adept at carving out a distinct space in dense mixes.
Typical Placement: Due to its pronounced midrange, it's commonly positioned slightly tilted and off-center, which allows for capturing the amplifier's inherent punch while ensuring a balanced high-end.
Neumann U87:
Type: Condenser
Characteristic Sound: With a broad frequency response, the U87 is versatile and captures a detailed and open sound, making it especially suitable for clean guitar tones.
Typical Placement: Given its sensitivity, it's often positioned a little further from the speaker, capturing both the direct sound and room ambiance. Angling the microphone can help prevent excessive brightness.
AKG C414:
Type: Condenser
Characteristic Sound: With multiple polar patterns and a rich sonic signature, the C414 is revered for its versatility and clarity.
Typical Placement: Often placed at a moderate distance from the amplifier to harness its detail and spatial resolution. Depending on the desired sound, its orientation can vary from head-on to slightly tilted.
Effect Pedals and the Guitarist's Unique Signal Chain
In the realm of electric guitar, effect pedals are akin to a painter's palette, providing an array of colors and textures. The way these pedals are ordered or "chained" can dramatically influence the final sound, and while every guitarist may have their preferred sequence, certain conventions have emerged over the years.
The Conventional Signal Chain:

Tuners: Positioned at the start, ensure your instrument is in tune before the signal traverses through subsequent effects.
Dynamics: This category, including compressors and limiters, is used early in the chain to control and shape the dynamic range of the guitar signal.
Gain Effects: Overdrives, distortions, and fuzzes amplify and color the guitar's tone, introducing varying degrees of grit and saturation.
Modulation Effects: Chorus, phasers, flangers, and vibratos add depth and movement, modulating the signal in diverse ways.
Time-Based Effects: Positioned towards the end, delay and reverb pedals create echoes and ambient spaces, extending and expanding the guitar's sound.
Individual Flair
While the above sequence is conventional, part of the beauty in crafting one's tone lies in deviation and experimentation. For instance, placing a reverb before a distortion can create a wash of ambient saturation entirely different from the conventional setup. The signal chain, thus, becomes a profoundly personal journey of sonic exploration for every guitarist.
The Wet and Dry Approach: Recording an unaffected (dry) and affected (wet) signal can be beneficial. This dual approach affords the flexibility to blend or manipulate sounds during the post-recording phase, ensuring a vast spectrum of tonal possibilities.
Maintaining Optimal Levels for Recording
Gain Staging: This process involves setting the appropriate levels at every stage of your signal chain, ensuring that the sound retains its integrity without introducing unwanted distortion or noise.
Steer Clear of Clipping: Digital clipping results in harsh distortion. By targeting peaks around -6dB on your digital audio workstation (DAW), you ensure adequate headroom for subsequent mixing processes.
Pursuit of Consistency: Layering multiple guitar tracks for harmony or thickness demands consistency in recording levels. This uniformity simplifies the mixing process, ensuring a cohesive blend of layers.
While conventions provide a foundational roadmap, the true magic in guitar soundscaping often arises from deviations, experiments, and personal nuances. By understanding the rules and knowing when to diverge, guitarists carve out unique sonic identities, making each pedalboard and signal chain an individualized artistic statement.
Conclusion
The intricate process of recording a guitar — whether acoustic or electric — is a harmonious interplay of both art and science. Each choice, from the type of guitar to the nuanced arrangements in the effects chain, creates a distinct sonic imprint, a musical signature unique to the artist. The beauty of this recording journey is that it is both universal and deeply personal.
While foundational principles provide a steady footing and a starting point, the world of guitar recording is vast and rich with possibilities. Personal exploration and experimentation are essential in carving out a sound that resonates with the artist's intentions and emotions. The meticulous attention to detail, the subtle shifts in mic positioning, or the intentional choice of an amplifier collectively build towards an aural masterpiece.
As you immerse yourself in this world, it's essential to remember that while techniques and equipment matter, it's the passion, dedication, and the quest for authentic self-expression that elevate a recording. The guidance provided in this guide serves not as strict rules but as markers on a vast map. It's a journey of continuous learning and rediscovery.
This guide aims to illuminate the path for both novices taking their first steps and seasoned professionals seeking refinement in their process. As you venture forward, cherish each challenge and triumph in your recording odyssey. Let every note, chord, and strum be a testament to your musical journey, capturing moments of pure inspiration and relentless pursuit of sonic excellence.