Ultimate Guide to Drum Recording: Mic Selection, Placement, and Techniques for Professional Results

The drums are paramount when it comes to one of the most important foundational elements of a song. The drums are usually where most recording and mixing starts. The drums lay the foundation for the song's rhythm and structure. Without the drums, most pop music wouldn't exist. So when we look at micing a drum set, we have to go back to our pre-production and our initial idea of the music. Some of the questions we should ask ourselves are:
Pop music for another genre? We want to know the type of music type because that will inform a lot of our microphone selection and mic placement. If we are recording jazz, we might want to think about recording the drums together instead of thinking about it as individual drums. This would mean that we would maybe use two to four microphones some distance away from the drum set to simultaneously capture all of the drums, giving a cohesive and together sound. However, if we are doing a pop or electronic tune, we need to consider the drum set as individual instruments. We would use separate microphones on each drum to really try to bring out the uniqueness of each particular drum itself.
What type of sound is the artist looking for? If the artist wants a small, intimate sound, 30 microphones on the drum kit would be too much. However, you might want to scale down your microphone selection to something much higher quality rather than quantity. The environment will dictate your sound as well. If the artist wants that intimate sound, you want to keep your recording environment for the drums as small and intimate as possible to curb unwanted reverb and reflections. But if the artist is looking for a big stadium-type sound, then multiple microphones on specific drums and the space you are recording will affect and give you that overall sound.
What are my equipment limitations? What is our budget? What are our equipment limitations? If we have 40 microphones to choose from, we have much more flexibility in how we want to mic and record the drums. But if we only have 1 or 2 microphones, our equipment now dictates the type of sound we get. As engineers, we need to work within the constraints that we find ourselves in with our clients.
Thinking about the mix before you record drums. Is this mix going to be from an audience perspective or a drummer's perspective? Will you have a wide stereo image of the drums or a narrow-focused image? Again these are questions you need to ask before choosing your first microphone because this will dictate which microphones you choose.


Where to start
Once we answer the previous questions, we can finally go to our drum set. We are going to approach this in two different ways. Both will require closer mics and then room mics.
Stereo Micing
The first way we will approach the drums is by looking at the drums as one instrument. We use this approach to record for jazz, singer/songwriter, and more intimate drum sounds. For this, we look for an overall picture of the drum set and usually try to capture the sound as it emanates up and out from the drum set. We will most likely use a stereo microphone technique to capture the entire drum set picture and try to angle it to best balance out the drums.
XY

XY Pair Mic Technique. Picture courtesy of DPA Microphones
The XY configuration is an excellent choice for capturing the overall image of a drum set while maintaining a coherent stereo field. In this setup, two cardioid microphones are positioned with their diaphragms coinciding and angled between 90-120 degrees to each other. This microphone setup is often used as overhead mics and is typically placed above the center of the drum kit, roughly equidistant from the snare and the kick drum, to ensure a balanced representation of the kit in the stereo field. The height of the mics in an XY configuration can significantly affect the sound. Lower placement results in a tighter, more focused sound, while higher placement gives a more ambient sound, capturing more of the room's natural reverb. It's crucial to remember that the further the mics are placed, the more cymbal sound they will pick up.
ORTF
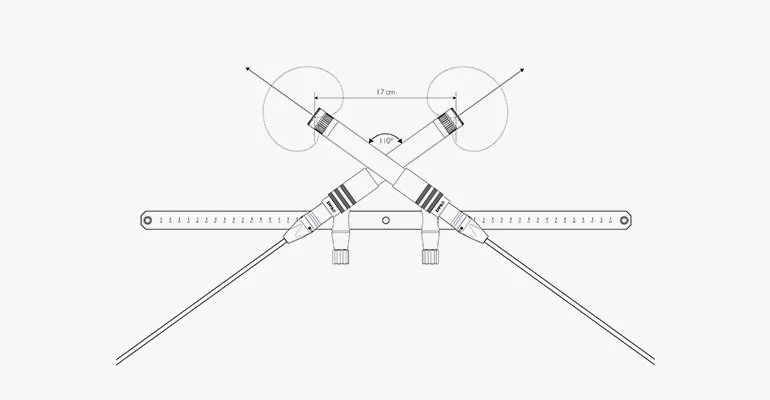
ORTF Stereo Mic Technique. Picture courtesy of DPA Microphones
The ORTF (Office de Radiodiffusion Télévision Française) configuration offers a broader, more spacious stereo image than the XY configuration. It uses two cardioid microphones spaced 17 cm apart and angled at 110 degrees from each other. Similar to the XY setup, the ORTF configuration is typically used for overhead miking to capture a comprehensive drum set image. The mics should ideally be placed above the drummer's head or slightly in front, positioned so that the imaginary line connecting the two mics passes through the center of the snare drum, ensuring a balanced capture of the drum kit. You can adjust the height according to the desired sound. A lower position will yield a tighter, more direct sound, emphasizing the attack of the drums, while a higher position captures more of the room's ambiance and cymbal wash. However, since ORTF captures a wider stereo image, careful placement is crucial to prevent any phase cancellation issues between the mics.
Mid Side Pair


The Mid-Side (M/S) configuration provides a highly controllable stereo image and is another excellent choice for recording drum overheads. This technique involves two microphones: one cardioid microphone pointing directly at the sound source (the 'mid' mic) and one figure-of-eight microphone set perpendicular to the mid mic (the 'side' mic). Typically, the mid mic is placed above the drum kit, centered to capture an even blend of the entire kit. The side mic is oriented such that one lobe points towards the left side of the kit and the other towards the right side, capturing the stereo information. The M/S pair's height will depend on how much of the room sound you want to capture. A higher position will include more room ambiance and cymbal presence, while a lower position will offer a tighter, more direct drum sound. One of the significant advantages of the M/S technique is its mono compatibility; when the side microphone is muted, the mid microphone provides a perfectly mono-compatible signal, helpful in ensuring that the drum mix will translate well to mono playback systems.
Spaced Pair

The spaced pair, also known as the A/B configuration, is another common approach to miking drum overheads. It provides a wide stereo image by utilizing the time-of-arrival stereo principle. Two cardioid or omnidirectional microphones are placed a few feet apart above the drum kit, typically aiming down at the cymbals. The exact positioning will depend on the specific sound you're after. A wider spacing will give a broader stereo spread but may also introduce phase issues due to the time difference of the sound reaching each mic. A narrower spacing will yield a more cohesive sound but less stereo width. A good starting point is to position the mics directly above the crash cymbals and about 3-4 feet above the kit. Also, to maintain a balanced stereo image, make sure both mics are equidistant from the snare, as this is typically the central point of the stereo image. Adjust the height and spacing to taste, as every room and drum kit will have its unique sonic character. Always use your ears to guide the positioning.
The Recorderman Technique

Picture courtesy of Drum Magazine
The Recorderman technique is a unique method for miking drums that uses two microphones to achieve a balanced, phase-coherent recording of the entire drum kit. The setup involves one microphone placed directly above the snare drum, typically about two drumsticks' length high, facing down. This mic captures the snare, toms, and cymbals. The second microphone is positioned over the drummer's shoulder, roughly the same distance from the center of the snare as the first microphone, aimed at the snare but also picking up the sound from the kick drum. Maintaining the same distance from each microphone to the snare is crucial to prevent phase issues. This technique can yield a surprisingly balanced drum sound with a strong sense of depth and stereo image, considering it only uses two microphones. The Recorderman technique is particularly useful in home studios or other situations where the number of available microphones or inputs is limited.
The Beatles Technique
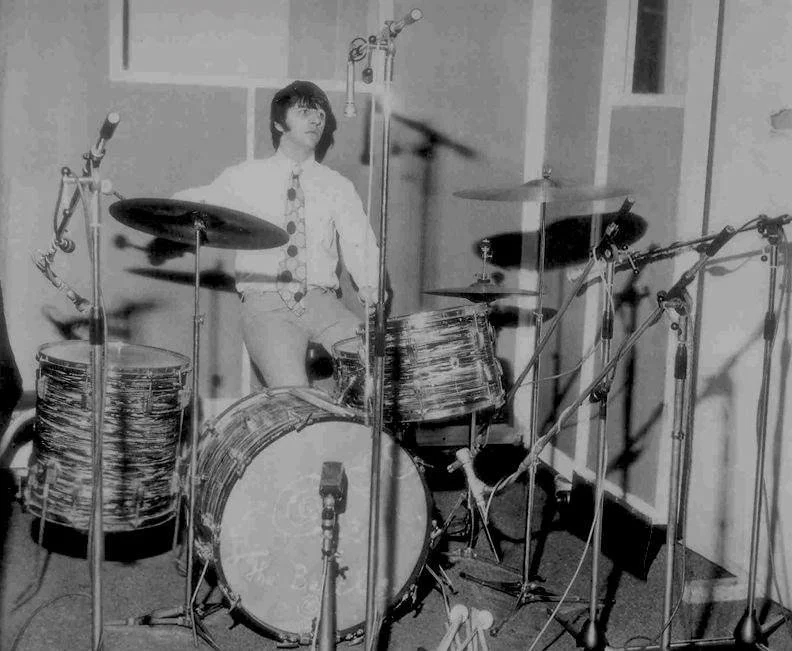
8 February 1968 Photo Apple Corps Ltd.
The Beatles' drum miking technique, often credited to their engineer Geoff Emerick, is renowned for its simplicity and effectiveness, and it was groundbreaking for its time. This approach typically involves four microphones. The first is a dynamic microphone (often a D12, D20, or a similar large diaphragm dynamic microphone) placed directly in front of the kick drum, around a foot away, to capture the low-end punch. The second mic, usually a ribbon or dynamic microphone, is positioned a few inches above the snare drum to capture the crack and sizzle. Then, two condenser or ribbon overhead microphones are positioned approximately 3-4 feet above the kit to capture the cymbals, toms, and overall room sound. These overhead mics are usually placed in a spaced pair configuration to get a wider stereo image. They are also often positioned in line with the kick and snare to maintain phase coherence. The Beatles' drum micing technique captures a natural and balanced drum sound with just a few mics, and it's perfect for genres where the drums need to sit well within a mix rather than dominate it.
Room Mics
Room microphones are an essential element in drum recording as they can capture the natural sound of the room and add depth and character to your drum sound. Where to position them greatly depends on the size and acoustics of your room, as well as the desired effect you're after.
When placing room mics, one common approach is to position them as a stereo pair some distance from the drum kit. How far you place them depends on the size of the room and the desired amount of room sound. A good starting point can be 10-15 feet from the drum kit. The mics can be set up in different configurations, such as a spaced pair or XY configuration, to capture a stereo image of the room. Some engineers may place the room mics closer to the floor to emphasize the low frequencies or higher up to capture more of the cymbals and high frequencies.
However, the room mics don't necessarily have to be in a symmetrical or conventional setup. Sometimes, placing a single room mic in the corner of the room or other unique locations can yield interesting results. When blended with the close mics and overheads, a mono room mic can add a different flavor and character to the drum sound. Experimentation is key here; try placing room mics at various points in the room, listen to the results, and decide what best complements your drum sound. Walking around the room while the drums are being played can be beneficial to find spots where the drums sound particularly good. These are ideal spots to place your room mics. As always, the ultimate decision should be guided by what sounds best for the specific song or project.
Room Mics: Thinking about the Mix
Adding room mics to a drum mix is an excellent way to add depth, space, and character. The process starts with balance. The room mics shouldn't overpower the close mics; instead, they should complement and enhance the overall drum sound. Their primary role is to provide a sense of space and ambiance. Listen as you increase the room mic level and notice how the drum sound changes.
An important thing to consider is the phase relationship between the room and close mics. Due to the distance from the drum kit, room mics will inherently capture sounds with a delay compared to close mics. This delay can sometimes lead to phase issues that make the drums sound hollow or weak. If this is the case, you might need to manually adjust the room mic's timing in the multi-track recording to better align with the close mics.
Another helpful technique is processing your room mics differently from your close ones. Compression can be particularly effective on room mics, enhancing the sense of space and ambiance. A common approach is to use heavy compression or a limiter on the room mics to bring out the ambiance and make the room sound more extensive than it is. This signal processing can provide an energetic, explosive drum sound.
Finally, consider the use of EQ on your room mics. They might pick up too much low end from the kick drum or too much high end from the cymbals. Use subtractive EQ to remove unnecessary frequencies and help the room mics blend better with the rest of the kit.
Always remember the objective is to serve the song. Depending on the style of music and the particular song, you might want the room sound to be very noticeable, or you might prefer a tighter, drier drum sound with less noticeable room sound. Listen critically and make adjustments as necessary to create a drum sound that fits the song.
Closing Micing a Drum Kit
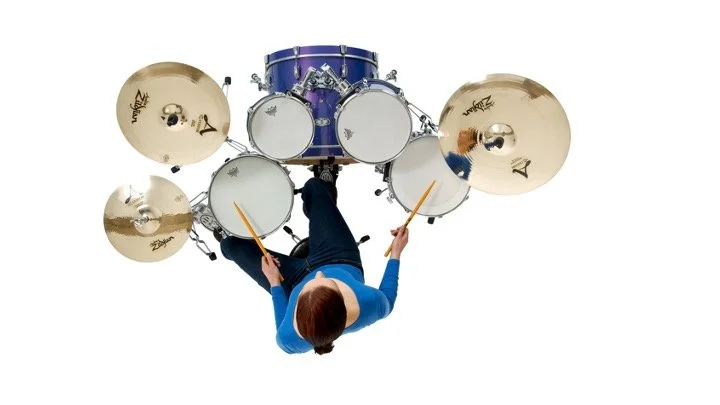
Close miking a drum kit involves positioning microphones near individual drums and cymbals to capture the unique sound of each element separately. This technique is commonly used in pop, rock, and other genres where each drum and cymbal must be distinctly audible and mixable in the final mix.
Typically, one microphone is used per drum (kick, snare, toms), and overhead microphones capture the cymbals and overall kit ambiance. You can use additional microphones for the hi-hat or specific cymbals, depending on the desired sound.
Close miking allows more control over the balance of different kit elements in the mix. It also reduces bleed between other parts of the kit, as each microphone primarily picks up the sound of the drum or cymbal in front of it.
However, the trade-off is that it can potentially sound less natural or cohesive compared to techniques that capture the entire kit with fewer microphones. This artificial sound is because you hear the combined sound of the kit, not isolated individual drums in a live acoustic setting. That's why in addition to the close mics, engineers often use room mics or overhead mics to capture the overall sound of the kit in the room.
Types of Mics to Use
Close miking a drum kit is a bit of an art form and can be adjusted depending on the style of music and the particular sound you're trying to achieve. Here's a general guideline to get you started:
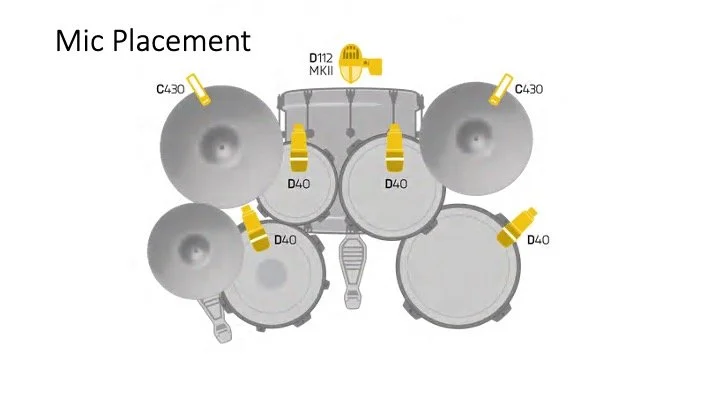
1. Kick Drum: The kick drum microphone should ideally be a dynamic mic designed for low frequencies. Place the mic inside the drum via the hole in the front skin, pointing towards where the beater hits the drum. Adjust the positioning and angle until you find a good balance between the attack of the beater and the low-end resonance.
2. Snare Drum: A dynamic mic is often used for the snare. Position the mic about an inch or two above the snare's rim, pointing towards the drum's center. This position generally provides a good balance of the attack from the stick and the drum's tone. Some engineers also mic the snare's underside to capture the snare wires' sizzle.
3. Toms: Dynamic mics are also usually used for toms. Position the mics similar to the snare, a couple of inches above the rim, pointing towards the center of the drum.
4. Hi-Hat: A small diaphragm condenser mic is often used for the hi-hat due to its superior high-frequency response. Position it a few inches above the edge of the top cymbal, pointing slightly towards the bell. Be careful to avoid picking up too much of the nearby snare drum.
5. Overheads: Overhead mics are typically condenser mics used to capture the cymbals and overall balance of the kit. A common approach is positioning them as stereo pairs above the kit. Many techniques exist to place these mics, like X/Y, ORTF, or spaced pair. Make sure that they are equidistant from the snare to avoid phase issues.
6. Room Mics: These are not close mics but are worth mentioning. The room mics are placed farther away from the kit to capture the sound of the drums in the room. They can add depth and space to your drum sound.
Be careful of Angles.
The angle at which a microphone is placed can significantly impact the sound it captures. Minor adjustments can yield different tonal results when close-miking a drum kit. Here are a few reasons why angles are essential:
Frequency Response: The microphone's angle can affect the frequency response it picks up. For example, placing a microphone straight onto a drum (90 degrees) will generally result in a brighter, more direct sound, while slightly angling it can capture more of the drum's body and tone.
Off-axis Coloration: Microphones, especially directional ones, can exhibit different frequency responses when not directly pointed at the sound source (off-axis). Some microphones might have more off-axis coloration than others. By adjusting the angle, you can use these off-axis characteristics to your advantage to shape the sound.
Bleed: The microphone's angle can affect how much sound it picks up from other drums or cymbals. For instance, if you're micing a snare drum, angling the mic away from the nearby hi-hat can help reduce the amount of hi-hat sound that the snare mic picks up.
Phase Issues: When using multiple microphones on a drum kit, the sound will reach each microphone at slightly different times. This delay can cause phase cancellation, where specific frequencies are reduced or lost. By adjusting the angle and position of the microphones, you can help minimize these phase issues.
Attack vs. Resonance: The microphone's angle can also change the balance between the initial hit's attack and the drum's resonance. For example, pointing the microphone directly at the point where the stick hits the drum head can emphasize the attack, while pointing it towards the edge of the drum might capture more of the drum's resonance.
Tracking to the DAW
In the days of 2-inch tape, understanding how to combine audio signals to save track space was essential. Nowadays, though, with the processing power of modern computers, we often can think about having unlimited tracks and power. Thus, I usually tell my students to record one microphone per track. This method gives you the maximum flexibility to edit and change things later. But even though we have all this processing power, we still need to understand the basics of gain staging and distortion when recording.
Gain staging is managing your audio signal levels at every signal path stage to achieve the best possible sound. In the recording with a microphone, the stages typically include the microphone itself, the preamp, any outboard gear (like compressors or EQ), your audio interface, and finally, your digital audio workstation (DAW).
Microphone to Preamp: Start with the gain on your preamp turned down. Have the drummer play the loudest part of the performance into the microphone. Slowly turn up the gain on the preamp until you get a strong signal, but make sure it's not clipping. Clipping is when the signal is too strong for the device to handle, causing distortion. On most preamps, an LED indicator lights up when the signal is clipping.
Preamp to Outboard Gear: The same principles apply if you're using outboard gear like a compressor. Ensure the output from your preamp isn't causing the compressor to clip. Also, please pay attention to the compressor's settings to ensure it's not squashing your signal too much or too little.
Outboard Gear to Audio Interface: The output from your outboard gear (if any) will go into your audio interface. Again, you need to ensure the signal is strong but not clipping. Most audio interfaces have preamps, but if you're using outboard gear, you'll typically bypass the preamp.
Audio Interface to DAW: Once your signal is in the DAW, you must manage the levels again. You'll typically see a meter on each channel in the DAW. As with the hardware, you want a strong signal but must avoid clipping.
The goal of gain staging is to maintain a healthy signal-to-noise ratio (SNR) without clipping at any process stage. If the gain is too low, you might increase the volume later and also increase the noise. If the gain is too high, the signal might clip, causing distortion.
Remember, it's better to err on the side of too little gain than too much. You can always increase volume later, but you can't remove distortion caused by clipping.
A Note about PreProcessing
Many students ask me if they should put effects like EQ and compression on before they record the tracks on the computer. I typically tell them no, as, in reality, your job as a recording engineer is to make sure that the mix engineer has the most flexibility in adjusting, changing, or keeping the track as is in the final mix. However, that's not to say that there are exceptions to the rule, such as when your signal chain requires a compressor to be part of the gain staging in order to prevent clipping. However, again, the choice of a microphone in itself is pre-processing period microphones have their own EQ curve called frequency response curves, which shape the Sonic characteristics of the recorded instrument. It's like the microphone has its own EQ. Thus, choosing microphones for specific characteristics is a form of pre-processing. But in general, I do not recommend putting EQ, compression, or reverb slash delay in the signal chain before being recorded.
Conclusion
Understanding how drums will be used in the final product will shape your decisions in choosing microphones, microphone placement, and room recordings. In a future article, I will be going through each drum individually to talk about things you should look for and consider when recording, say, a kick drum, a snare drum, a high hat, etcetera.