Mastering The Basics: The Aux Buss and Aux Sends

An SSL 9000K Series Console
Mastering the Basics: the Aux Buss and Aux Sends
Understanding the functionality of an audio console is essential for anyone keen on working in sound engineering or music production. At the heart of this intricate machine, you'll find the auxiliary bus, better known as the Aux Buss, and the auxiliary sends, or Aux Sends. These two features might seem complex at first, but they provide immense control and flexibility over the sound.
Auxiliary Buss: An Introduction
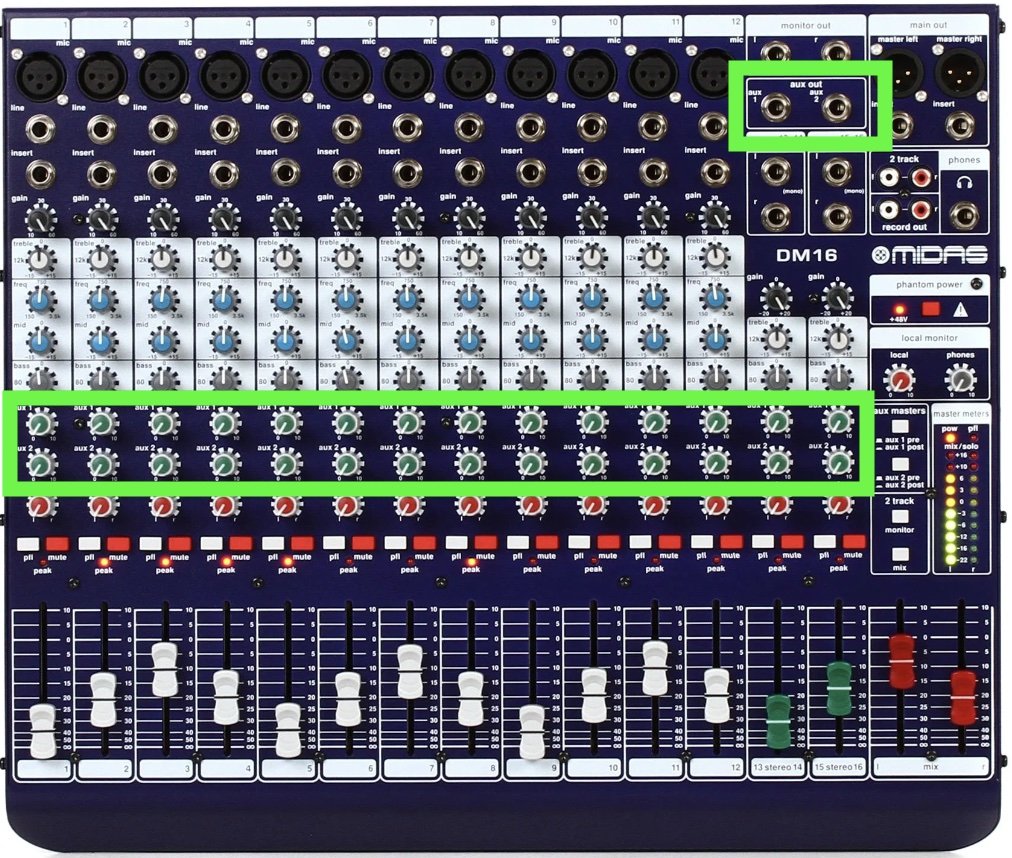
In any audio console, the term 'buss' refers to a pathway or conduit for audio signals. Busses perform the integral function of grouping and routing these signals to different destinations. Among the multiple busses, you'll find in a typical console, the auxiliary buss, or 'aux' buss, holds a place of particular significance.
The aux buss is a dedicated pathway designed to accommodate specific routing needs. Rather than just passing audio from the input to the output, it enables sophisticated and customized routing tasks, bringing higher control and flexibility to audio management. This feature is instrumental in enhancing the depth, clarity, and balance of the sounds you're working with.
At its core, the primary function of an aux buss is to send a blend or mix of channels to a destination distinct from the main mix. It operates independently of the main buss, enabling you to create and manipulate additional mixes without affecting the primary output. This flexibility is what makes the aux buss an invaluable tool in both live sound and studio environments.

For instance, in live sound reinforcement, an aux buss could be used to create a separate mix for stage monitors or in-ear monitors, distinct from what the audience hears. In a recording studio, aux busses are often used to send a mix to effects processors like reverb or delay units. We will get more into some practical uses further down this article.
The functionality of the Aux Buss
To understand how an aux buss works, imagine a complex highway interchange. The audio signals from different channels are like vehicles on this highway. Each audio signal has a unique car color (Maybe the kick drum is red, for example, and the snare blue). Each "vehicle" or audio signal can take multiple routes, with the aux buss being one such route. The auxiliary controls determine the level of signal sent down this route, with the option to send none at all. Down the offramp, you might see a mix of red and blue cars for a particular headphone mix, for example. You might just see blue cars (snare) for the offramp leading to a reverb effect for another example.

When you twist the knob on an aux send control, you determine the amount of audio signal from that channel to be sent down the aux buss. This signal can then be mixed with signals from other channels, creating a unique blend. This then creates unique mixes.
Aux Sends: Where it All Begins.

The aux send is the mechanism by which the audio signal is directed down the aux buss. Without aux sends, the aux buss would have no audio to route.
Every channel strip on an audio console typically has at least one aux send control. This knob lets you decide how much of each channel's signal to send to the aux buss. For instance, in a band setting, the drummer may need more of the bass guitar in their monitor mix. You would turn up the aux send on the bass guitar channel going to the drummer's monitor mix.
Pre-Fader and Post-Fader Sends
Aux sends can be set up in two ways: pre-fader and post-fader. In a pre-fader setup, the aux send picks up the signal before it reaches the channel fader. This means that changes to the channel fader won't affect the level sent to the aux buss. This is particularly useful when you want a consistent level going to a performer's monitor, regardless of adjustments made for the house mix.
On the other hand, a post-fader send picks up the signal after the channel fader. Any changes to the fader will impact the level sent to the aux buss. This setup is common when using aux sends for effects like reverb or delay in a mix, where you'd want the level of the effect to track with changes to the channel level.

Auxiliary Returns
The auxiliary return is the complement to the aux send. It allows you to bring the processed audio signal back into the console, whether it's a monitor mix or an effects mix. Typically, this return is mixed back into the main mix, but it can also be routed to a different aux buss or directly to an output, depending on the desired result. Aux returns are like extra channels into the console with less functionality. They usually just go straight to the stereo mix buss and do not have a lot of extra routing capabilities.

Practical Applications
Let's delve a little deeper into its functionality.
In the context of live sound reinforcement - such as in concerts, theatre productions, or public speaking engagements - the aux buss comes into play in a distinctive way. Here, it can be used to generate separate mixes tailored for stage monitors or in-ear monitors.
Consider another live concert situation: the audience hears one mix while the musicians on stage require another mix to perform effectively. The singer might need more of the backing vocals and less of the drums, the guitarist might want to hear more of their guitar and the bass, and so on. Each musician's mix is typically routed through a stage monitor or in-ear monitor, enabling them to deliver their best performance. This separate mix is usually created and controlled through one or more aux busses.

Furthermore, the aux buss can be instrumental in managing feedback. By finely adjusting the monitor mix, sound engineers can prevent the microphones from picking up sound from the speakers, which causes a feedback loop. All this while the guitarist wants to hear more of their own instrument, the drummer wants a mix heavy on bass, and the singer wants to hear themselves clearly over everything else. Using separate aux sends for each monitor, you can satisfy everyone's requirements without impacting what the audience hears through the main mix.
In a recording studio setting, the aux buss plays a slightly different but equally important role. It's often utilized to direct a mix of audio channels toward outboard effects processors, like reverb or delay units. This is known as an 'effects send.' Adjusting the levels sent to the aux buss allows you to control the wet/dry balance, thereby defining how much of the effect is applied to the sound.

For instance, suppose you're working with a vocal track that needs some reverb. You can create an effects send via the aux buss to a reverb unit. This method allows you to add the desired reverb effect to the vocal track without altering the original signal, giving you a cleaner, more controllable mix. Using an aux buss for effects like this has a key advantage: you can send multiple channels to the same effect. So, if you want that same reverb on your backing vocals, you just turn up the aux send on those channels too. This not only saves processing power, it also creates a more cohesive sound.
Aux busses can also be used for sub mixing. Say you're mixing a drum kit with multiple microphones. You can send all those signals to an aux buss, balance the kit there, and then bring that balanced mix back into your main mix on a single fader. This makes overall level adjustments much easier.
Fine-Tuning Your Mix with the Aux Buss and Aux Sends
Understanding their function and potential is the key to effectively using the aux buss and aux sends. Start by identifying the needs of your mix or live situation. Are there specific instruments that need to be more pronounced in certain areas or for certain performers? Do you wish to add specific effects to a group of channels? These questions can guide your use of the aux buss and sends.
Also, don't be afraid to experiment. Try different combinations of sends, tweak the levels, and listen carefully to the results. Over time, you'll develop a keen ear for how these features can enhance your mixes.
Conclusion
Though complex, the auxiliary buss and sends are indispensable tools for both studio and live sound engineers. They offer the flexibility to customize monitor mixes, apply effects, and streamline control over large mixes. So take the plunge, explore these features, and unlock a new level of control over your audio. With time and practice, the aux buss and sends will become second nature, expanding your ability to craft the perfect mix.